Android 4.1.2 Jelly Bean Update Available For Samsung Galaxy Camera GC100: How To Install It [Tutorial]

Samsung started rolling out the Android 4.1.2 Jelly Bean Update for its Galaxy Camera (GC100) in the UK Wednesday. The firmware update brings a lot of new features to the camera including multi-view, multi-task and extensive gallery app.
The users of the Galaxy Camera can update it to the latest firmware version through Samsung KIES utility or by using the inbuilt firmware update feature. However, if you still face problem in updating the device, you can try out the manual installation procedure explained below.
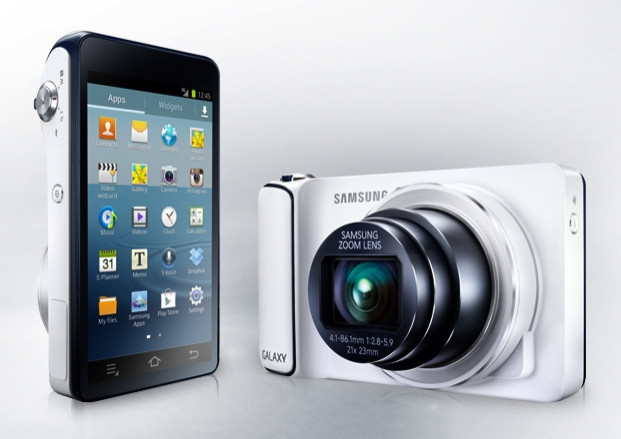
Introduced at IFA in Berlin, the Samsung Galaxy Camera features 4.8-inch Super Clear LCD display, 16 megapixel camera, 1.4 ghz quad-core processor, Wi-Fi, hspda and Samsung’s latest touch-wiz Nature UI.
In this tutorial to install the official Android 4.1.2 Jelly Bean firmware in the Galaxy Camera, model number GC100, a toll called ODIN will be used that will help flash the stock 4.1.2 firmware in the device.
Before going ahead with the installation process, take a look at the firmware details:
Product code: EK-GC100TADBTU
PDA: GC100XXBLL7
CSC: GC100OXABLL7
Version: 4.1.2
MODEM: GC100XXBLL7
Date: 2012-12-28
Regions: Austria, Belgium, France, Germany, Hungary, Italy, Spain and the UK.
There are some prerequisites that the users need to be aware of:
- Back up your data.
- Make sure that the device has at least 80 percent battery power.
- USB Driver Installed in the PC for the Samsung Galaxy Camera.
- Ensure that USB Debugging is enabled.
- This tutorial is only for Samsung Galaxy Camera, model number GC100. Don’t try this on any other Android device.
- The users also must note that IBTimes will not be held responsible for anything that goes wrong. They should proceed at their own risk.
In addition, after installing official firmware, the users will lose already installed custom ROM like CM10, Paranoid Android or AOKP. They will also lose the custom recovery such as ClockworkMod Recovery or TWRP Recovery if they have any.
How To Install
Step 1: Download Android 4.1.2 GC100XXBLL7 for Galaxy Camera GC100 and extract the zip file.
Step 2: Download Odin 3.07 and extract the zip file.
Step 3: Power off your Galaxy Camera and wait for vibration to confirm complete switch off.
Step 4: Put the Galaxy Camera in Download Mode. Click here for details.
Step 5: Run Odin3 v3.07.exe as an Administrator.
Step 6: Connect your Galaxy Camera with your PC via USB. You will get a message saying “Added” under the Odin's message box. In addition, if the device is connected properly, you will see the COM port with a number in Yellow.
Step 7: Select the following files from GC100XXBLL7 folder:
- Click the PDA Button and select the .tar file here with *code* appearing in its name.
- Click the Phone Button and select file with *modem* in its name (leave if there is no such file)
- Click the CSC Button and select file with *csc* in its name (leave if there is no such file)
- Click the PIT Button and select the .pit file. Use only if you got it while extracting in step 1 above, otherwise ignore it.
Step 8: In Odin window, make sure that Auto Reboot and F. Reset Time checkboxes are selected. In addition, if you are using a .pit file, ensure that Re-Partition checkbox is selected. Otherwise, it should NOT be ticked.
Step 9: Click on the START button to begin the flashing process.
Step 10: Once flashing is done, you will see a PASS message with a green background in the left-most box at the top of the Odin.
Your Galaxy Camera will now automatically reboot and soon you will see the Samsung logo on the screen. The device can now be disconnected from the computer.
In case the Galaxy Camera gets stuck at booting after Step 10, just go to the recovery mode (click here for details) and carry out Wipe data/Factory Reset task and then select reboot system now function.
[Source: Android Jinn]
© Copyright IBTimes 2026. All rights reserved.
- MOST POPULAR IN Technology