‘Destiny 2': Spire Of The Watcher Full Dungeon Encounters Guide

KEY POINTS
- Players must activate power cables by shooting nodes
- Nodes can only be shot when the Arctrician buff is active
- Yellow cables must be shot in the correct order while red ones operate on a timer
The Spire of the Watcher in "Destiny 2" is one of the easiest and most unique of the game's dungeons in terms of the map layout. Players should have no problem going through this Vex-infested facility, but the mechanics and encounters throughout the dungeon can be confusing at first.
Here's a complete guide detailing steps players need to take as they go through the Spire of the Watcher for the first time.
Main Dungeon Mechanic
Before diving into the dungeon proper, players should first understand the main mechanic involved in each of the encounters.
Unlike the complicated bells and war banners mechanic in the Duality dungeon, Spire of the Watcher only involves cable management. More specifically, players need to power up large power cables by shooting specific nodes in a linear sequence.
First, players must grab the Arctrician buff from nearby Minotaurs. Stand in the energy pool they form upon death to gain the buff. Cable nodes cannot be activated without this buff, and successfully activating one will extend the buff's duration.
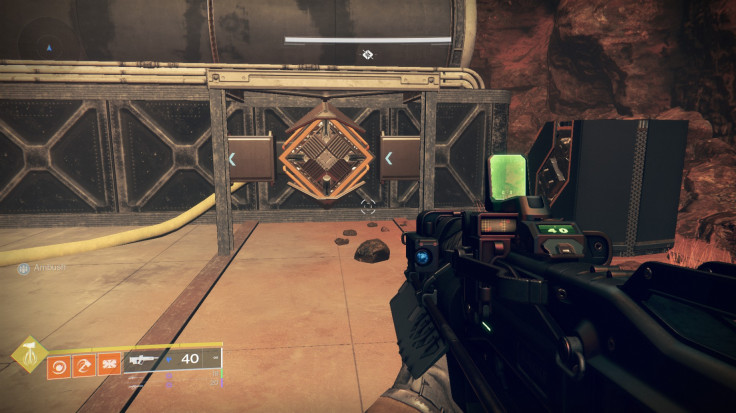
Next, cable nodes always have a proper start and end point. Start points are indicated by fuse boxes placed right next to the nodes. Always shoot these first as, otherwise, the rest of the nodes will not light up.
This is the only mechanic players need to worry about throughout the entire dungeon, and the intro portion should be a great place to learn how it works.
Again, shoot the fuse box nodes first. Once these are lit, follow the yellow cables carefully and shoot the nodes in the proper sequence.
First Encounter – Ascend the Spire

After opening the gate and navigating through the Reactor Firewall, players will have to climb three spire floors by activating power circuits.
There are two circuits on each floor, and players must shoot them all in the correct order. Keep in mind that the nodes can be activated from any range as long as players can hit them with gunfire, and they have the Arctrician buff active.
The biggest threats in this encounter are the wandering Hydras and the swarms of exploding Supplicants. Consider bringing a sniper rifle or linear fusion rifle to get rid of the Hydras from a distance.
Tons of Goblins will also spawn on each floor as well. Thin them out when they appear so they don't bog anyone down.
Second Encounter – Akelous, The Siren's Current

At the very top of the spire is the dungeon's first boss, Akelous. The mechanic remains the same. Activate power circuits to initiate the damage phase. The cables all connect to fuel rods found at the end of each catwalk. Once the fuel rods are down, players can start wailing on the boss.
It's very important to coordinate with the team on when the final fuel rod is going to be activated. Start each cycle by having one Guardian activate one circuit each, then finish the fourth circuit together. This is because Akelous will begin charging up at the location of the fuel rod that was activated last.
While the boss is charging, stand in front of it and shoot all of the red eyes that appear on its front plates. Once the eyes are gouged, shoot its center core to deal damage. Precision weapons like snipers and linear fusion rifles are excellent for this.
Rinse and repeat the process until the boss is dead.
Third Encounter – Persys, Primordial Ruin

The rooms leading to the reactor room introduce red power cables. Unlike their yellow counterparts, the nodes on these cables are timed. They can be shot in any order, but players have to complete the circuit quickly or else they will all power down again.
This mechanic ties in with the final boss, Persys.
There are two rooms in this arena: the safe room and the reactor room. The former is the one that players spawn in, while the latter is the one the boss starts in.
Inside the safe room is one red cable circuit with nodes on each pillar and one on the giant door. On each flank of the safe room are yellow cable circuits that connect to the reactor room.
The main goal here is to cause the reactor to overload and lock Persys inside of the room to take down its shield.
First, clear the Hydras that spawn in. Then, kill the Minotaurs to get the Arctrician buff. Use this to open the red circuit. Doing so will cause two random yellow circuits to open up. Shoot the yellow fuse box nodes and complete the circuits that connect the safe and reactor rooms.
Before shooting the final yellow node, make sure Persys is in the reactor room. Once the messages pop up, immediately run back to the safe room and pop the red circuit nodes again. This will lock Persys in the reactor room and eventually strip it of its overshield.
When the door opens, blast the boss with weapons and supers. Swords, rocket launchers and linear fusion rifles are all great DPS options for this.
Repeat until Persys is destroyed.
© Copyright IBTimes 2026. All rights reserved.
- MOST READ